Keeping your pavement maintenance business thriving requires a steady flow of new clients. Facing stiff competition? You’re not alone. The industry is growing, but that doesn’t mean you can’t get ahead! Here are 10 effective strategies to attract new clients and grow your pavement maintenance business.
We’ll explore a range of tactics, from building a strong online presence to leveraging local connections. By implementing these strategies, you can position your business as the go-to choice for eco-friendly and reliable pavement maintenance.
Strategies To Get Leads For Your Pavement Maintenance Business
1. Build a Strong Online Presence
In today’s digital age, potential clients often research businesses online before making a decision. A strong online presence allows you to showcase your services, service areas, and provide estimated quotes. It also demonstrates your professionalism and credibility in the market.
Is your company meeting these expectations?
If not, it’s time to leverage the power of the internet to attract more customers and grow your pavement maintenance business.
Create and Optimize Your Website
A website is your digital storefront, open 24/7. It’s crucial for attracting new customers and showcasing your pavement maintenance expertise.
Do you have a website?
- If not, create one! This can be done by hiring specialists or using user-friendly website builder platforms.
- Already have a website? Make sure that it’s optimized for lead generation.
Here’s what your website should include:
- Clear and concise information about your services: Highlight pavement maintenance services you offer, like crack filling, sealcoating, and pothole repair.
- High-quality photos and videos: Showcase your work and the finished product.
- Service area: Specify the geographic regions you serve.
- Easy-to-find contact information: Make it simple for potential clients to reach you.
- Testimonials and reviews: Positive feedback builds trust and credibility.
- A clear CTA: Tell visitors what you want them to do next, like requesting a free quote or contacting you for a consultation.
RELATED: The 5 Key Reasons Your Asphalt Business Must Have a Website
2. Content Marketing
One good way to get leads is via content marketing. If your rivals haven’t used this strategy, then you have an excellent advantage.
Add a “Blog” section to your website and fill the category with informative blog posts, videos, and articles. The content can revolve around tips and suggestions to take care of the pavement, common issues that the channel faces, and what benefits the maintenance has.
When you post consistently, you are bound to attract organic traffic that will eventually let people know that your company exists as well. This places you on the list of credible pavement businesses that people prefer signing deals with.
3. Embrace Social Media
Social media has power to take your business from zero to hero. And where is the lie? Even if companies don’t have websites, they create their social media profiles on multiple channels like Facebook, LinkedIn, and Instagram to reach the masses.
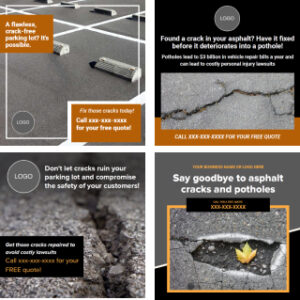
Social media is mostly free, and the only thing you have to do is publish regularly. Post pictures and videos of your work, before and after photos, client testimonials, and even tips for pavement maintenance!
You can also run targeted ads so your content will reach your audience more effectively.
RELATED: How to Grow Your Asphalt Maintenance Business using Social Media
4. Prepare An Email List
Is your email list limited? You can grow that, too. How? The email list can increase once you add content that is considered valuable in the eyes of the potential customer.
Provide them with the option of downloading guides or availing free consultations on the condition of exchanging email addresses. The audience should be given an incentive to follow the call to action.
To achieve this target, make sure that the form you or your team attaches to the social media channels and website is clear inside out. The guides and consultation will grab the attention of those who want to learn how to manage the pavement.
RELATED: A Short Guide to Asphalt Maintenance Business Mailing List
5. Focus On Targeted Campaigns
Have a thorough look at your customer list. Observe their needs and preferences when they approach similar companies. Focus on targeted campaigns in such a manner that your emails help out the customers by providing the correct solutions and enticing them with the services they have been hunting for. If you want double leads, then offer exclusive discounts and promotions that are under a limited-time option, so it triggers urgency. You will notice the increasing leads as you keep an incentive on the sign-ups.
6. Don’t Spam, Inform and Engage
Customers are bombarded with marketing messages daily. Constant sales pitches will only push them away.
Instead, focus on providing valuable content through email marketing:
- Informative newsletters: Share tips on pavement maintenance, like DIY crack filling techniques or seasonal maintenance reminders.
- Industry updates: Keep readers informed about new pavement materials or technologies.
- Special offers and promotions: Occasionally, showcase special offers alongside valuable content, not as the sole focus.
7. Join Your Chamber Of Commerce
Leverage the power of local networking! Join your area’s chamber of commerce to connect with other contractors, both large and small.
These organizations frequently host events where you can exchange ideas, showcase your services to a wider audience, and potentially secure referrals. You might even land a project with a larger company looking for reliable pavement maintenance services.
8. Collaborate With Related Businesses
You are definitely not the only pavement maintenance platform. How do you expect that people will know about your company? To get more leads, collaborate with related businesses like property management, landscape ventures, and construction companies. Initiate referral programs where you offer them good discounts on referring your services to their clients. Sounds like a witty tactic, right?
9. Add Your Business In Online Directories
Add your business’s name to the online directories that consist of the names of companies that specifically cater to pavement maintenance services. Start with directories that offer free listings. Make sure you provide accurate details.
If your budget allows, explore paid directory listings. These often offer increased visibility in search results, attracting a wider audience of potential clients.
10. Transform Your Work Vehicles Into Advertisements
Invest in a full or partial vehicle wrap featuring your company logo, contact information, and a clear service message. This high-impact advertising travels wherever your trucks go, maximizing brand awareness. Consider removable magnetic signs for a more budget-friendly option.
These can be easily applied and removed, allowing you to customize messaging for different projects or locations. Simple and professional vinyl lettering displaying your company name, contact details, and website is a cost-effective way to advertise your vehicles.
RELATED: Make Your Brand a Competitive Advantage
Conclusion
It is not difficult to get leads for your pavement maintenance business; you just need to market them well online and offline. Give it some time, and be ready to answer calls when clients approach you.
Boost Your Digital Presence with Asphalt Kingdom
Looking to take your pavement maintenance business to the next level? Check out the Asphalt Kingdom Digital Presence Package! This comprehensive service includes brand design, website optimization, social media setup, and digital marketing strategies tailored to your business needs. Perfect for both startups and established companies, this package ensures you stand out online, attract more clients, and grow your business efficiently. Elevate your brand and make a lasting impact with professional support from Asphalt Kingdom.
Explore more about this game-changing solution here.